There are many things to consider before removing a bathtub. In order to remove the existing tub, you'll have to open up the three walls surrounding it. If the room is small, then the toilet, sink, and cabinet may also have to be removed. Keep in mind, that new tubs differ in width from old tubs, which means that before you can install a new tub, you need to remove the base moulding, floor covering, and underlayment. They, too, will need to be replaced. When you get right down to it, one thing leads to another when removing a bathtub. Replacing an old bathtub with a new bathtub is a very difficult project. Much of the tile on the walls will be damaged during the removal. If the old tub is readily accessible, the project can move quickly; if you have to open a wall to remove the old tub and position the new tub the task is much harder.
You will need a helper to move out the old tub and set in the new one. You may want a professional plumber to make tube connections. On this page you will find the basics of replacing an old bathtub with a new one -- or a "change-out," as the professionals call it.
Your present bathtub probably is sandwiched between two walls, with the faucets and shower head located on one of these walls. You should be able to disconnect the piping and then pull the tub straight out. If this doesn't work, you may have to remove a wall section, cut the piping, and remove the tub through the wall. Your bathtub may be freestanding, giving you open access to the pipes and fittings. Removal is simply a matter of disconnecting the piping and lifting the tub out. Remove the toilet and flush tank, or lavatory to make room (or lift the tub over these fixtures).
On this page, we show how the piping is disconnected/connected and the tub is removed/replaced when the tub is between two walls. If your tub is free standing, the steps will be similar. Here are the steps:
Disconnect the tub drain using a large adjustable wrench or Channel-lock pliers. Then loosen the slip nut connecting the overflow pipe that runs from the bathtub drain pipe. If necessary, remove the tub drain strainer, which will release the drain pipe below it (Figure 2). If hot and cold water faucets are inside the bathtub (not above it), remove these fixtures back to supply connections.
Remove the wall covering (such as tile) from around the tub. One course of tile is plenty. Use a hammer and cold chisel for this and wear safety glasses to protect your eyes from flying debris (Figure 3). If the wall is not tiled, remove about four inches of material to expose the clips holding the tub. These fasteners will be attached to a ledger strip around the tub. Remove or disengage the fasteners. The tub may simply sit directly on the ledger strip (Figure 4).
With a prybar and a piece of scrap wood to protect the wall (if needed), gently pry the tub away from the wall. Go completely around the tub. With a helper, try moving the tub out a tad more. If you meet any resistance, chances are the tub is not completely disconnected from the water supply and/or drainage system. Go back and check this. If you find a hang-up, disconnect it or reposition it. Then try moving the tub again.
Hopefully, you will be able to move the tub straight out from the wall. If so, put down some 1×4 skids or a piece of plywood so the tub won’t damage the floor as it is moved out and so the tub is easier to slide. You will need a helper for this; bathtubs weigh plenty. Don’t try to move the tub alone. If the tub can’t be removed by sliding it straight out, remove the wall opposite the faucet and exit here (Figure 5). This will involve cutting framing members, which you will replace later. However, the wall may be load bearing and you must shore up the framing — before you make cuts — with two or three lengths of 2×4 or 2×6. If you are unsure about the house structure, consult a building contractor, engineer, or architect. If you can’t get the tub out of the back wall, it will have to go through the plumbing wall. The pipes will have to be cut accordingly and capped. If the pipes are plastic or copper, you can remove them with a hacksaw just above the opening for the tub. If the pipes are galvanized steel, you may be able to disconnect them at the coupling. Use pipe wrenches for this. One wrench goes on the fitting and the other one on the pipe. Put down skids for the tub, as suggested above, and have a helper assist you in the tub removal. When the tub is out, you can lift and carry it with aid of helpers.
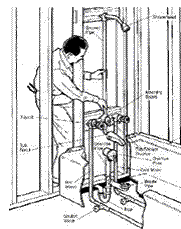
Figure 1. The walls surrounding your bathtub will be framed something like this. If the wall is load-bearing (meaning it helps support the house structure), you have to support the remaining studs when others are cut out. Do not cut the studs until the wall is properly supported. A ledger may be used to support the tub or it may be supported by clips attached to the studs. Before you buy the replacement bathtub, make sure the new tub will fit into the space and make sure you can move it through all doorways.
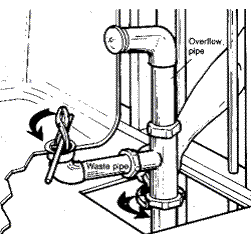
Figure 2: Disconnect drain, waste, and overflow pipes by loosening locknuts. Tub strainer screws out.
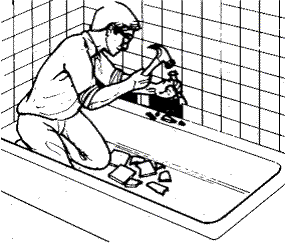
Figure 3: Remove wall covering to expose ledger (if present) and release tub support clips. Wear safety glasses while removing wall tiles.
The procedure for installing the new bathtub is almost the reverse of taking out the old one. We will assume that the new tub is approximately the same size as the old one; therefore, the piping and fixture will align properly. If not, the piping will have to be modified to match the new tub before it is moved in. Also check the wall surfaces.
You will have to install a new wall surface or patch the old so it rests on the flange of the new tub once the bathtub is in its final position. Use cement backerboard under tile in the tub area. Normal drywall cannot withstand the extreme moisture in these locations. Do not paint cement backerboard.
Finish the wall around the tub. If you have to replace the wall around the tub, we recommend that you use cement backerboard. Regular drywall may be used on the other side of the framing. Add new framing where the old was cut to make room for the tub removal. Apply the drywall, tape and sand it, and then finish the wall.
You may want to mark the panels next to the baseboard in case you have to remove the panel again for repairs.
Tile or paint the wall to complete the project.
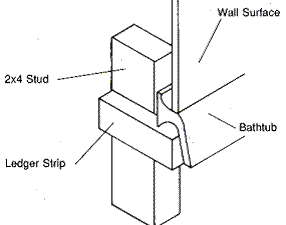
Figure 4: Tub may rest on ledger strip. If so, lift it off the strip when you remove the old tub. Tub may be held with hanger clips, which have to be loosened or removed before the tub can be taken out.
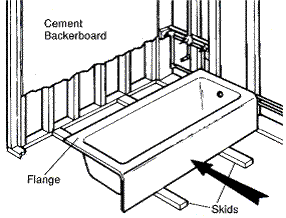
Figure 5: You may have to remove the tub from the side wall. If so, remove the wallboard from framing members, shoring up the wall with 2x4s before making cuts. Remove pipes, if needed.
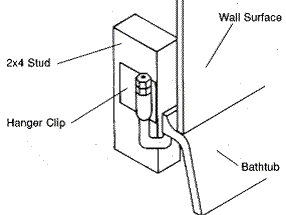
Figure 6: Move in new tubs on skids and with a helper. Tub flange rests on a ledger of hanger clips. Level the tub when in final floor position.

Family owned since 1954, In-house staff, Independent Laboratory for material testing.

Save money & time.
Replacements are above $5800 and take weeks. Tub Refinishing starts at $425 and it’s done in one day!

Custom, cutting-edge industrial coatings. Superior triple-adhesion system: surface chemical etch, mechanical etch & bonding agents.

Signature speedy customer service! Quick & Efficient responses.
7 Days a week, 8AM-7PM
Transform your old, worn-out bathtub into a shiny, like-new finish with our expert reglazing service!
Our expert reglazing service restores your tub’s shine, giving it a smooth, glossy, and like-new finish in just one day! Contact us today to bring your bathtub back to life.
Copyright © 2025 The Bathtub Guy. All rights reserved. Designed By Asif